home staging julie brown

Grab 'em at the Curb

If you're thinking of selling your home, it goes without saying that curb appeal is CRITICAL and is always factored into the overall staging plan.  It doesn't need to be complicated ... just stick to the basics and your property will stand out, especially during the upcoming summer months:

  • make sure potential buyers can find your home! ... that means attractive house numbers that are visible from the road OR, for rural properties, ensuring the fire # is easily visible.

  • if your home is not visible from the road (long laneway), make sure there's a display of flowers, planters, decor or lighting at the end of your driveway. Little touches go a long way.

  • invest in a new mailbox (again, rural properties especially !!)

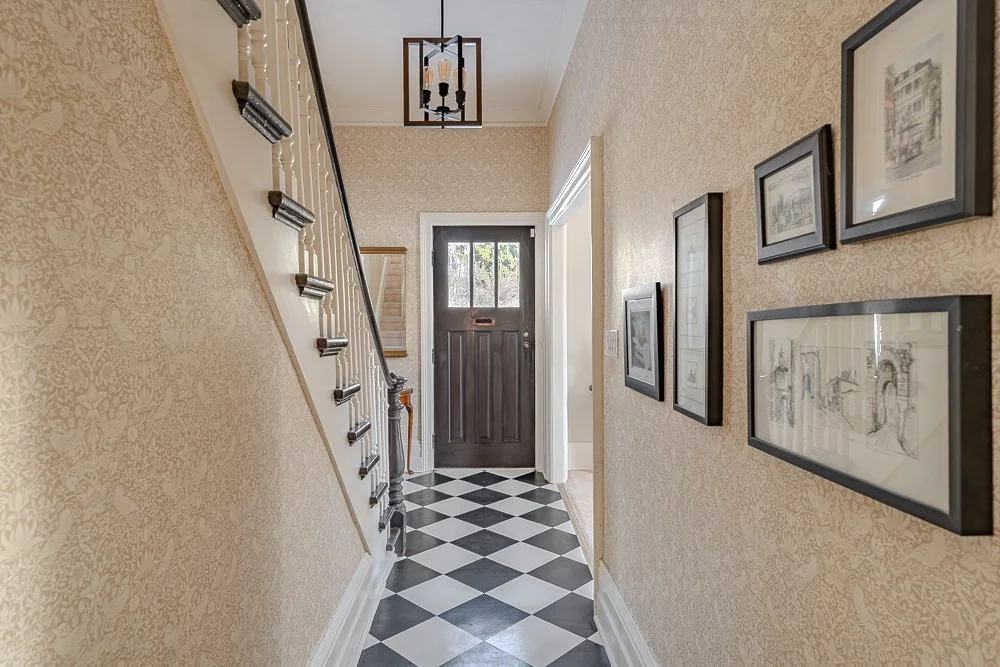
  • add a fresh coat of paint to the front door. Make it complement the house and trim along with a 'wow' colour to stand out. If you are unsure, there are online apps that will help you to visualize the look.

  • invest in a new doormat.

  • make sure door handles, locks, and your doorbell are working properly. If they are standard 'brass' consider painting them.

  • ensure your walkway is clear by trimming tree branches, shrubs, etc.

  • ensure that all yard equipment, trash cans, kids toys and pet 'stuff' is out of sight.

  • depersonalize if necessary - ie. remove family name signs, flags, etc.

  • show off how fun your yard can be by adding in lifestyle items like a hammock, raised fire pit or outdoor games.

  • weed or scale back your gardens, keep the grass cut and add in a few nice floral touches (hanging plants or containers).

  • consider pressure washing your home and decks if needed (very satisfying!)

  • have your outdoor lights on at night with sufficient wattage ... most people will drive by after hours. Consider spotlights to showcase it even more!

  • repair any porch bannisters and railings and add a new coat of paint if needed.

  • don't forget your outdoor living space. Very popular these days to bring the indoors out with fashionable cushions, outdoor rugs, etc.


Remember, these are all great investments that you are making towards ensuring your home sells quickly and for more money ... it will be worth it!

Summer Outdoor Style Tips

Summer is finally here and that means relaxing outdoors.  If you have an outdoor living area, it’s the perfect time to style it for the upcoming months.  Here are a few quick tips:

Create pops of color
When you think of summer, what comes to mind are shades like yellow, orange, bright blues, vibrant pinks and greens. Pops of these colours can be easily incorporated via:

  • flowers from your garden (peonies, roses, lilies, etc.) placed in a colourful vase on a table

  • potted plants in brightly-coloured (painted) flower pots

  • outdoor table decor such as colourful placemats, dining and drinkware (doesn't need to be expensive - bargain shops and Wal-mart offer nice collections)

  • rugs, accent pillows, seat cushions and, depending on your space, you may even be able to add some colourful art on outdoor walls

  • patio umbrellas, outdoor curtains (perhaps if privacy is needed?), lanterns, hammocks and plastic Adirondack chairs - always lots of great colours and fun styles to choose from!

Add in some soothing sounds
To make your space feel more like an oasis, add in water elements (fountains or bird baths) or sound elements such as wind chimes.  

Set the mood for after-hours
Solar lights, candles and fairy lights offer low-cost, lighting solutions for when the sun goes down.  Spread them out where you can enjoy what each solution has to offer.  For instance, solar lights can light pathways or step areas, fairy lights can be strung around patio canopies (or hang down from them), placed inside lanterns (which can then hang from branches), wrapped around outdoor faux plants, real tree trunks or deck posts.  And, don't forget about glow sticks!

Have some fun with it but ... do it now!  Summer in Ontario is short :)


Why Home Staging Works

Staging is done to show a home in its best light.

I love using the analogy of selling your car when trying to explain the importance of staging. If you want to sell your car for the most money possible (and in the quickest amount of time) you will detail it (wash it, wax it, vacuum it, etc). The same goes for your home just on a much larger (and more important) scale.

Here are some of the key reasons why home staging works:

  • It suggests to buyers that you take excellent care of your home.

  • 90% of people can’t envision the potential of a home beyond what they see in front of them - hence the reason why showcasing a clean, neutral, attractive space is so important (along with showing the intended function of each room!)

  • Buyers want to do as little work as possible when buying a home. If if looks like it needs any amount of work, all they will see is the money, effort, and time that will be needed to get the home the way they want it (and will probably walk away at that point). By doing the work for buyers, they feel they can just move right in and relax and enjoy their new home.

  • Many buyers assume if you can’t bother making your home look good while selling it, then perhaps you’ve neglected routine maintenance or repairs. It’s both a red flag and a turn-off.

  • When you show buyers how to use each space, buyers are able to envision themselves moving right in. They won’t question which rooms work best for different purposes. When they have to think about how to use each room, they wonder whether there are enough rooms in the home. You don’t want any second guessing.

  • Finally, seeing the home in excellent condition justifies the price you’re asking and removes all reasons for them to offer you less than your asking price.

Here’s one of my recent stages showing the power of staging to help visualize a space:

BABasement.jpg

The Do's and Don'ts of Decorating with Mirrors

Mirrors can play so many roles that it’s hard not to have them as one of my ‘go to’ accessories when staging. They can make a space feel larger, increase light in a room, act as artwork to create a mood and reflect a great view. Using a mirror also gives me the opportunity to show off an architectural feature or other selling point of the property that a potential buyer might overlook.

Here are some basic DO’s and DON’T’s when it comes to decorating with mirrors:

DO:

  1. use large mirrors in tiny rooms

  2. use mirrors in narrow hallways and staircases

  3. use mirrored furniture to your advantage - mirrored side tables, for instance, beside the bed in a small bedroom will help widen the space

  4. use full-length floor mirrors

  5. pretend mirrors are decorative windows

  6. display one in the dining room

  7. use multiples in bathrooms

  8. use mirrors to showcase a beautiful view

DON’T:

  1. place mirrors in random locations (reflecting random things)

  2. put mirrors in kitchen (not needed and if they are placed near sinks or other activity areas they create a cleaning nightmare)!

  3. go overboard with mirrors in your bedroom - bedrooms are meant to be restful areas - it’s okay to place one above a headboard but avoid mirrored closet doors for instance

  4. place a mirror opposite the front door - instead hang a foyer mirror on a side wall

  5. hang one above a fireplace (or anywhere too high) - they often reflect the ceiling or light fixture

Incorporating Black into Staging & Design

Black has always been a good building block for interior design and the same holds true when it comes to staging.  Black helps to ground the space, provide dimension in a room and adds a touch of elegance.   I most often incorporate black into my staging projects via:

  • pillows

  • mirrors

  • clocks

  • prints (black frames and images)

  • lampshades

  • baskets

  • vases

Most homes now have black flat screen TVs (in at least one room) so using black accent pieces to balance the TV out works well.  The same goes for fireplaces which are most often black (and a strong focal point).  Bottom line is that you can never go wrong with adding in some black!  Here are a few of the black accents that I have used in staging:

When designing for living, there are so many ways to use black:

  • sinks, faucets

  • lighting

  • accent walls in any room

  • windows and doors

  • rugs

  • furniture (large or small pieces)

  • curtains and curtain rods

  • backsplashes

  • and so much more ...

Black sofas can be difficult (sofas are big and heavy looking to begin with so a black one has the potential to really drag a room down).  Here are some general design pics with black that I found online:

Most Common Home Buyer Complaints (and how staging can solve them)

My role as a home stager is to remove all reasons for a buyer NOT to make an offer.  Talk to any real estate professional and they are likely to confirm that there are consistent complaints from buyers that surface with all showings.   Here are the top three complaints (which, by the way, can all be solved with some simple home staging):

bed.jpg

“It’s too small/cramped”

Buyers will often complain that a home feels too small or cramped.  This typically has more to do with the perception of the size rather than the reality of it.  Some things that cause a home to feel tight are clutter, oversized/bulky furniture, too much furniture in a space, a bad layout, and insufficient lighting.  I always recommend that you declutter your home before it goes on the market.  Get rid of as much as you can, including paring down the décor on shelves and surfaces to open up each room and make it feel larger. 

Similarly, bulky (or too much) furniture can crowd a space. Keep the furniture visually lightweight and only have a few necessary pieces. Don’t block the doors or windows and make sure there is a natural flow to the space.  Lastly, make sure each room has plenty of natural light or artificial lighting to fill in dark corners.

 “It needs too much work”

In the case of a fixer-upper, this is a given, but many buyers will pass on a home that needs a lot of cosmetic changes too. Most buyers simply can’t see past personalized décor. When they see brightly-coloured walls or overpowering window treatments, it can be too distracting for them to imagine themselves in the space. It can also be overwhelming to think about all the changes they will have to make for it suit their personal style.

175 Cameron Street MLS and Web 037.jpg

I always recommend neutralizing  your home’s décor before putting it on the market. This will make it much easier for the buyer to imagine it as their own.  They won’t feel rushed to change anything (to feel comfortable in the home) but instead will get excited thinking about what they will be able to do with a blank canvas.

 “It just doesn’t feel like home”

Similar to the last complaint, this one is often caused by a home feeling too much like a stranger’s home not only because of the décor, but also the personalized touches like family photos and toiletries sitting out on the bathroom counter. Too many reminders that someone else lives in the home breaks up the fantasy for many buyers and gives them an uneasy feeling that they can’t quite put their finger on.

You need to make buyers feel relaxed on a subconscious level.

The above suggestions will help buyers overlook things that may not be exactly what they were looking for, but the home “feels” so good that they can’t resist making an offer. 

— Julie Brown, CCSP

Wall & Ceiling Woes

A well-staged home …

will draw attention away from the home's flaws & weaknesses and focus on its positive elements.  Since walls are one of the most prominent features in any home, they are vital to staging and their condition and colour need to be addressed prior to showings.  The good news is that, for minimal cost, a big impact can be made.  Here are some quick tips for addressing your wall and ceiling 'woes':

Paint with staging safe colours (neutrals)

This is important when it comes to selling since these colours neutralize the space, lighten the room(s), de-personalize the space and create a perfect backdrop for showcasing/decorating.

Paint with low-sheen finish

This will reflect less light which makes it harder to notice surface imperfections.  Although flat paint does a great job of this, it's not durable (or often aesthetically appealing which makes it perfect for ceilings); therefore, the better choice for walls would be an eggshell finish.

Paint over wallpaper?

Yes, you can!   However … there are varying opinions about how (and even if) this should be done.  That said, you will want to research techniques and cost prior to embarking on this task (if done correctly, covering the seams is even possible).

You don’t need to be a pro. There are simple and inexpensive ways to create the effect by combining trim and narrow crown molding.  Installing crown molding can provide an instant element of luxury and create a great visual impact for showings. 

Cover popcorn ceilings

Popcorn ceilings instantly date a home and scraping them can be costly (and very messy).  Applying a coat of paint will brighten them up; however, it doesn’t change the design itself.  Covering with tiles, decorative planks, or even fabric are possibilities.